FREE AND/OR REDUCED RATE COURSES
How do I qualify? Three types of financial help:
Buster Boost
Garden City Community College is committed to decreasing barriers to higher education for high school students in its service area. The Buster Boost program waives the cost of tuition and student per-credit-hour fees for dual-credit courses taken by service area high school students.
Income Eligibility Guidelines, School Year 2023-2024
| Household Size | Free Benefits | Reduced-Price Benefits |
|---|---|---|
| 1 | $ 18,954 | $ 26,973 |
| 2 | $ 25,636 | $ 36,482 |
| 3 | $ 32,318 | $ 45,991 |
| 4 | $ 39,000 | $ 55,500 |
| 5 | $ 45,682 | $ 65,009 |
| 6 | $ 52,364 | $ 74,518 |
| 7 | $ 59,046 | $ 84,027 |
| 8 | $ 65,728 | $ 93,536 |
| For each additional household member, add | ||
| $ 6,682 | +$ 9,509 | |
FAQ
The Buster Boost program covers the costs of tuition and student per-credit-hour fees for all high school students in the College’s service area counties, including Finney, Greeley, Hamilton, Kearny, Lane, Scott, and Wichita counties.
The cost of electronic textbooks is included for most classes offered at GCCC. Students who wish to rent physical textbooks pay an additional flat rental fee ($9.99 per textbook, including tuition). For more information, and to rent a textbook, contact the College bookstore (virga.west@gcccks.edu; suzanne.johnson@gcccks.edu).
No combination of scholarships or potential tuition waiver may exceed the cost of tuition, fees, or books.
This is something that must be worked out with the local district’s counselor and administration, as Garden City Community College has no direct access to this information. If an individual has a question regarding the program, please feel free to email Dawn Tucker, Dual Credit Coordinator (dawn.tucker@gcccks.edu).
Student eligibility is determined at the point of applying to the College (for new students) and annually when enrolling in college courses. Students on free and reduced lunch waivers complete an additional verification step with additional signatures on their application/course enrollment forms. This information is processed by the College’s Dual Credit Coordinator, Student Records office, and Business Office. Information about a student’s free and/or reduced lunch status is not visible to instructors.
If a student fails a course, they risk harm to their GPA and future progress in higher education. The first time a student’s semester GPA falls below a 2.0, the student will be placed on academic probation and will only be allowed to enroll as a part-time student (fewer than 12 credit hours) in future semesters. The second time a student’s semester GPA falls below a 2.0, the student will be placed on academic dismissal and will be required to apply for reinstatement. For more information on this process, contact Dean of Students Tammy Tabor (tammy.tabor@gcccks.edu).
All paperwork must be received at the time of course enrollment for any given semester.
No, the Buster Boost program is specifically limited to students who reside in Garden City Community College’s service area.
The College service area includes 7 counties: Finney, Greeley, Hamilton, Kearny, Lane, Scott, and Wichita counties.
The College’s intention is to fund the Buster Boost program indefinitely. However, the program will be evaluated on an annual basis and may be discontinued or reduced at any time. The College will guarantee the program for, at minimum, the Fall 2024 and Spring 2025 semester and will re-evaluate financial viability on an annual basis.
No, there is not a limit. However:
- A high school Counselor and/or Site Coordinator, working collaboratively with the student and based on academic history, schedule, etc., may recommend a cap on the number of credit hours for a student;
- Enrolling in 10 or more credits per semester will require approval from the high school Counselor as well as either the College’s Dean of Academics or the Dean of Technical Education and Workforce Development.
Yes, if their permanent residency is in an eligible county. Exchange students are not eligible as their permanent address is not within an eligible county.
Students who are home-schooled may be eligible for the Scholarship; as long as their permanent address is within the College’s 7-county service area; the same applies for students in private schooling.
Eligibility will be determined by the families adjusted gross income. Eligibility is determined based on the Kansas State Department of Education (KSDE) income eligibility guidelines for Free and Reduced Meals each year.
Yes, the College will verify eligibility from home schooled and students who attend private schools by using their household size and income from their previous year tax documents. Those should be submitted to Dawn Tucker, Dual Credit Coordinator (dawn.tucker@gcccks.edu) at the time of course enrollment. Once approved, the scholarship will be available for the entirety of the academic year, but must be renewed on an annual basis, as eligibility guidelines change each year.
*Once this eligibility is verified, the GCCC does not retain or report this information.*
The cost of electronic textbooks is included for most classes offered at GCCC. Students who wish to rent physical textbooks pay an additional flat rental fee ($9.99 per textbook, including tuition). For more information, and to rent a textbook, contact the College bookstore (virga.west@gcccks.edu; suzanne.johnson@gcccks.edu).
No. The program covers the cost of tuition and student per-credit-hour fees, meaning for most high school students all costs have been covered. No combination of scholarships or protentional tuition waiver may exceed the cost of tuition, fees, or books. This includes GCCC scholarships administered by service area high schools.
No, the benefits of the program cannot be retroactively applied.
If you are interested or have questions regarding the Buster Boost opportunity, please contact Dawn Tucker dawn.tucker@gcccks.edu
Excel in CTE FAQ
The Kansas State Senate passed Excel in CTE, which authorizes GCCC to waive the cost of tuition for high school students who meet Kansas residency requirements for enrollment in any approved career technical course. Textbooks, program fees and other additional fees may apply.
GCCC offers several CTE program courses on our campus, as well as a variety of online offerings.
These include but are not limited to: Accounting, Allied Health, Animal Science, Automotive, Business Administration, Carpentry, Computer Science, Police Science/Criminal Justice, Early Childhood, EMR/EMT, Fire Science, Manicuring.
Excel in CTE Offerings at GCCC
Direct to High School Scholarships
- Any student attending a high school in the GCCC service area: Syracuse High School, Lakin High School, Deerfield High School, Holcomb High School, Garden City High School, Garden City Achieve, Garden City Virtual Academy, Dighton High School, Scott Community High School, Wichita County High School, Greely County High School.
- Be enrolled in a non-technical (CTE) course at GCCC.
GCCC annually provides all high schools in our service area with scholarship funds. The high school counselor or other designated representative at each high school has complete discretion as to how funds are dispersed.
Students who are enrolled in courses at GCCC should contact their local high school counselor or site coordinator.
GETTING STARTED
If you are a high school student in our Service area you should contact your high school counselor first.
For students outside our Service Area, please contact the Dual Credit office, 620-276-0441 for more information regarding enrollment procedures.
For more information regarding policies and procedures, as well as student rights
and responsibilities, please refer to the Dual Credit (High School) Student Guide.
ELIGIBILITY AND PREREQUISITES
High school sophomores, juniors or seniors (or 9th grade students identified as gifted
with a current IEP) may enroll in selected college classes offered at, and in cooperation
with, their high school.
Some courses have prerequisite requirements which ensure that you are academically
prepared to be successful in your college course.
GCCC has multiple ways to qualify for courses: GPA, ACT/SAT and Accuplacer scores.
Reading, English and Math are the most placed courses for high school students.
ENROLLMENT OPTIONS:
Online/Zoom – Classes taught completely online by GCCC instructors via Canvas, our online learning platform. School districts may provide students with access to a teacher during their school day to offer support.
Dual enrollment – During the academic year or summer, prior to high school graduation, students can travel to the college campus to take courses.
Concurrent enrollment – Classes taught at the high school, with an approved high school teacher, who teach college credit during the normal school day.
TUITION, FEES & PAYMENT
|
|
SEAMLESS SYSTEMWIDE TRANSFER
The Transfer Kansas portal houses all Systemwide Transfer (SWT) courses approved by the Kansas Board of Regents. SWT courses transfer to any Kansas public institution offering an equivalent course. The decision of lower division courses to count toward upper division credit hours is at the discretion of the receiving institution.
TECHNOLOGY/LOG-IN ASSISTANCE
OneLogin Setup
OneLogin is our Single-Sign On service that allows us to incorperate Multi-Factor Authentication to applications on campus. It is a one stop shop for signing into all of your applications. Once it has verified that you are the one signing in, you will be able to access all the applications you need from one place and not have to sign in to every one individually. It is both more convinent for the user and more secure.
You may access OneLogin from the OneLogin Portal found here.
One category of authenitication is something you own. As such, OneLogin requires the use of a phone to verify the user login. You will need a phone with the following specs:
- Android 5.0 (Lollipop) or above (released in 2014)
- iOS 11.0 or above (released in 2017)
If you do not have a phone with one of these requirements, please contact IT at matt.stockemer@gcccks.edu or call (620) 276-9673
Installing
- Access the App Store.
- Swipe down from the middle of the Home screen. This should bring up a search bar
- In the search bar, type "App"
- At the bottom of the screen there will be a section saying "Applications"
- There will be a tile called "App Store" with the following image

- Search for "OneLogin Protect" the icon should look like the following:

- Install the application to your phone. It will require you to log in with your Apple
Account to verify that you are wanting to install the application
Configuring
NOTE: This requires that you can access your OneLogin account. If you can not access your account, email IT-Help Desk. If you can not access your email, you may call (620) 276-9673. We will give you a temporary code to allow you to log in. This code will be good for only 3 days and one login, so make sure to complete the following steps.
-
- From a computer, go to gcccks.onelogin.com
- Check the URL at the top of the page and insure that it is the correct URL. You will
be typing in your username and password and this is a good practice any time you type
in your password. Ensure that it also is encrypted by making sure there is a lock
next to the URL.

- You should see a prompt for your username and password

You can type either your email or username in this field, both will work

- From here you will be prompted for your password. It will be your LDAP password used for logging into your email.
- If you cannot current access your OneLogin account, you will need to contact IT and set up temporary passcode. These passcodes are only good for onelogin and within 3 days of being issued. If you cannot email us, you may call (620) 276-9673
- If you've been issued a temporary code, you will need to place it at the prompt and
hit continue

For additional Login and setup questions, please email matt.stockemer@gcccks.edu
Email Setup
Email can be accessed in several ways, please read the instructions for your prefered method
Web Browser
- You can either follow a link to office.com or outlook.office.com
- You will need to log-in. You will need to type your full email address (eg billy.buster@gcccks.edu)
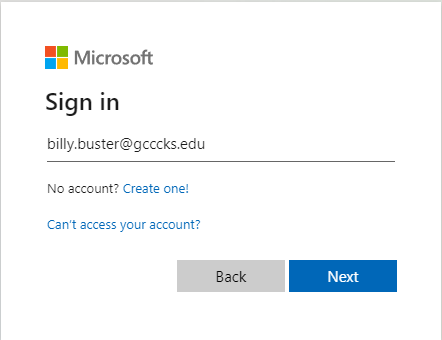
- From here you will be redirected to OneLogin (see above if you do not have OneLogin set up)
You can use either your full email or your user name here - You will be prompted to type in your password, check the URL to make sure you are at the gcccks.onelogin.com domain before typing your password!!!
- You will then be prompted for multi-factor authentication, if you recieve a push notification, check to make sure the information is correct and hit "Accept"
- Follow the remaining prompts if need be and you will be directed to your inbox
- If you access your email from office.com, you will need to click on the Outlook icon on the left hand side

- If you access your email from office.com, you will need to click on the Outlook icon on the left hand side
Outlook Application
-
If you haven't already, install the Outlook for Android app from the Google Play Store or click here to enter your phone number and receive a download link.
-
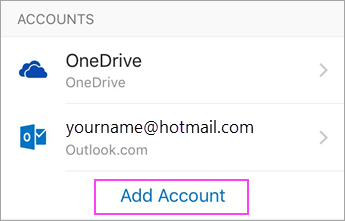
Open Outlook for Android. If this is the first time, tap Get Started and Skip if you're prompted to add any detected accounts. Otherwise, open the
Menu > Settings >
 > Add Account > Add Email Account.

-
Enter your company email address, then tap Continue.
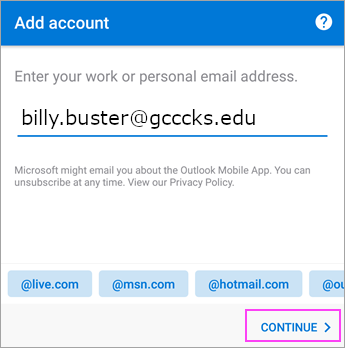
- This may direct you to OneLogin which you will have to type your email again and password.
-
Tap Exchange.

-
Enter your company email address and password to automatically configure your account. Tap Sign In.
- Tap Next when finished and swipe through the features.
More information about using Outlook on Android can be found here
-
if you haven't already, install the Outlook for iOS app from the iOS App Store
-
Open the Outlook for iOS app and tap Get Started if it's your first time. Otherwise, open the Menu
in the upper left corner.
-
Tap Settings>
> Add Account > Add Email Account. -
Enter your company email address, then tap Add Account.
-
Tap Exchange.
-
Enter your company email address and password to automatically configure your account. Tap Sign In.
- Tap Next when finished and swipe through the features.
More Information about Outlook on iOS devices can be found here.
CONTACTS
-
Dawn Tucker, Dual Credit Coordinator
(620) 276-0441
dawn.tucker@gcccks.edu